Within the esqlabsR framework, the simulations are run
by defining and executing multiple scenarios. A scenario is
defined by the simulation file containing the model structure,
parametrization of the model, application protocol, and (optionally) the
physiology of the simulated individual or population. To simplify
scenarios set up, all this information is stored in Excel files with a
defined structure.
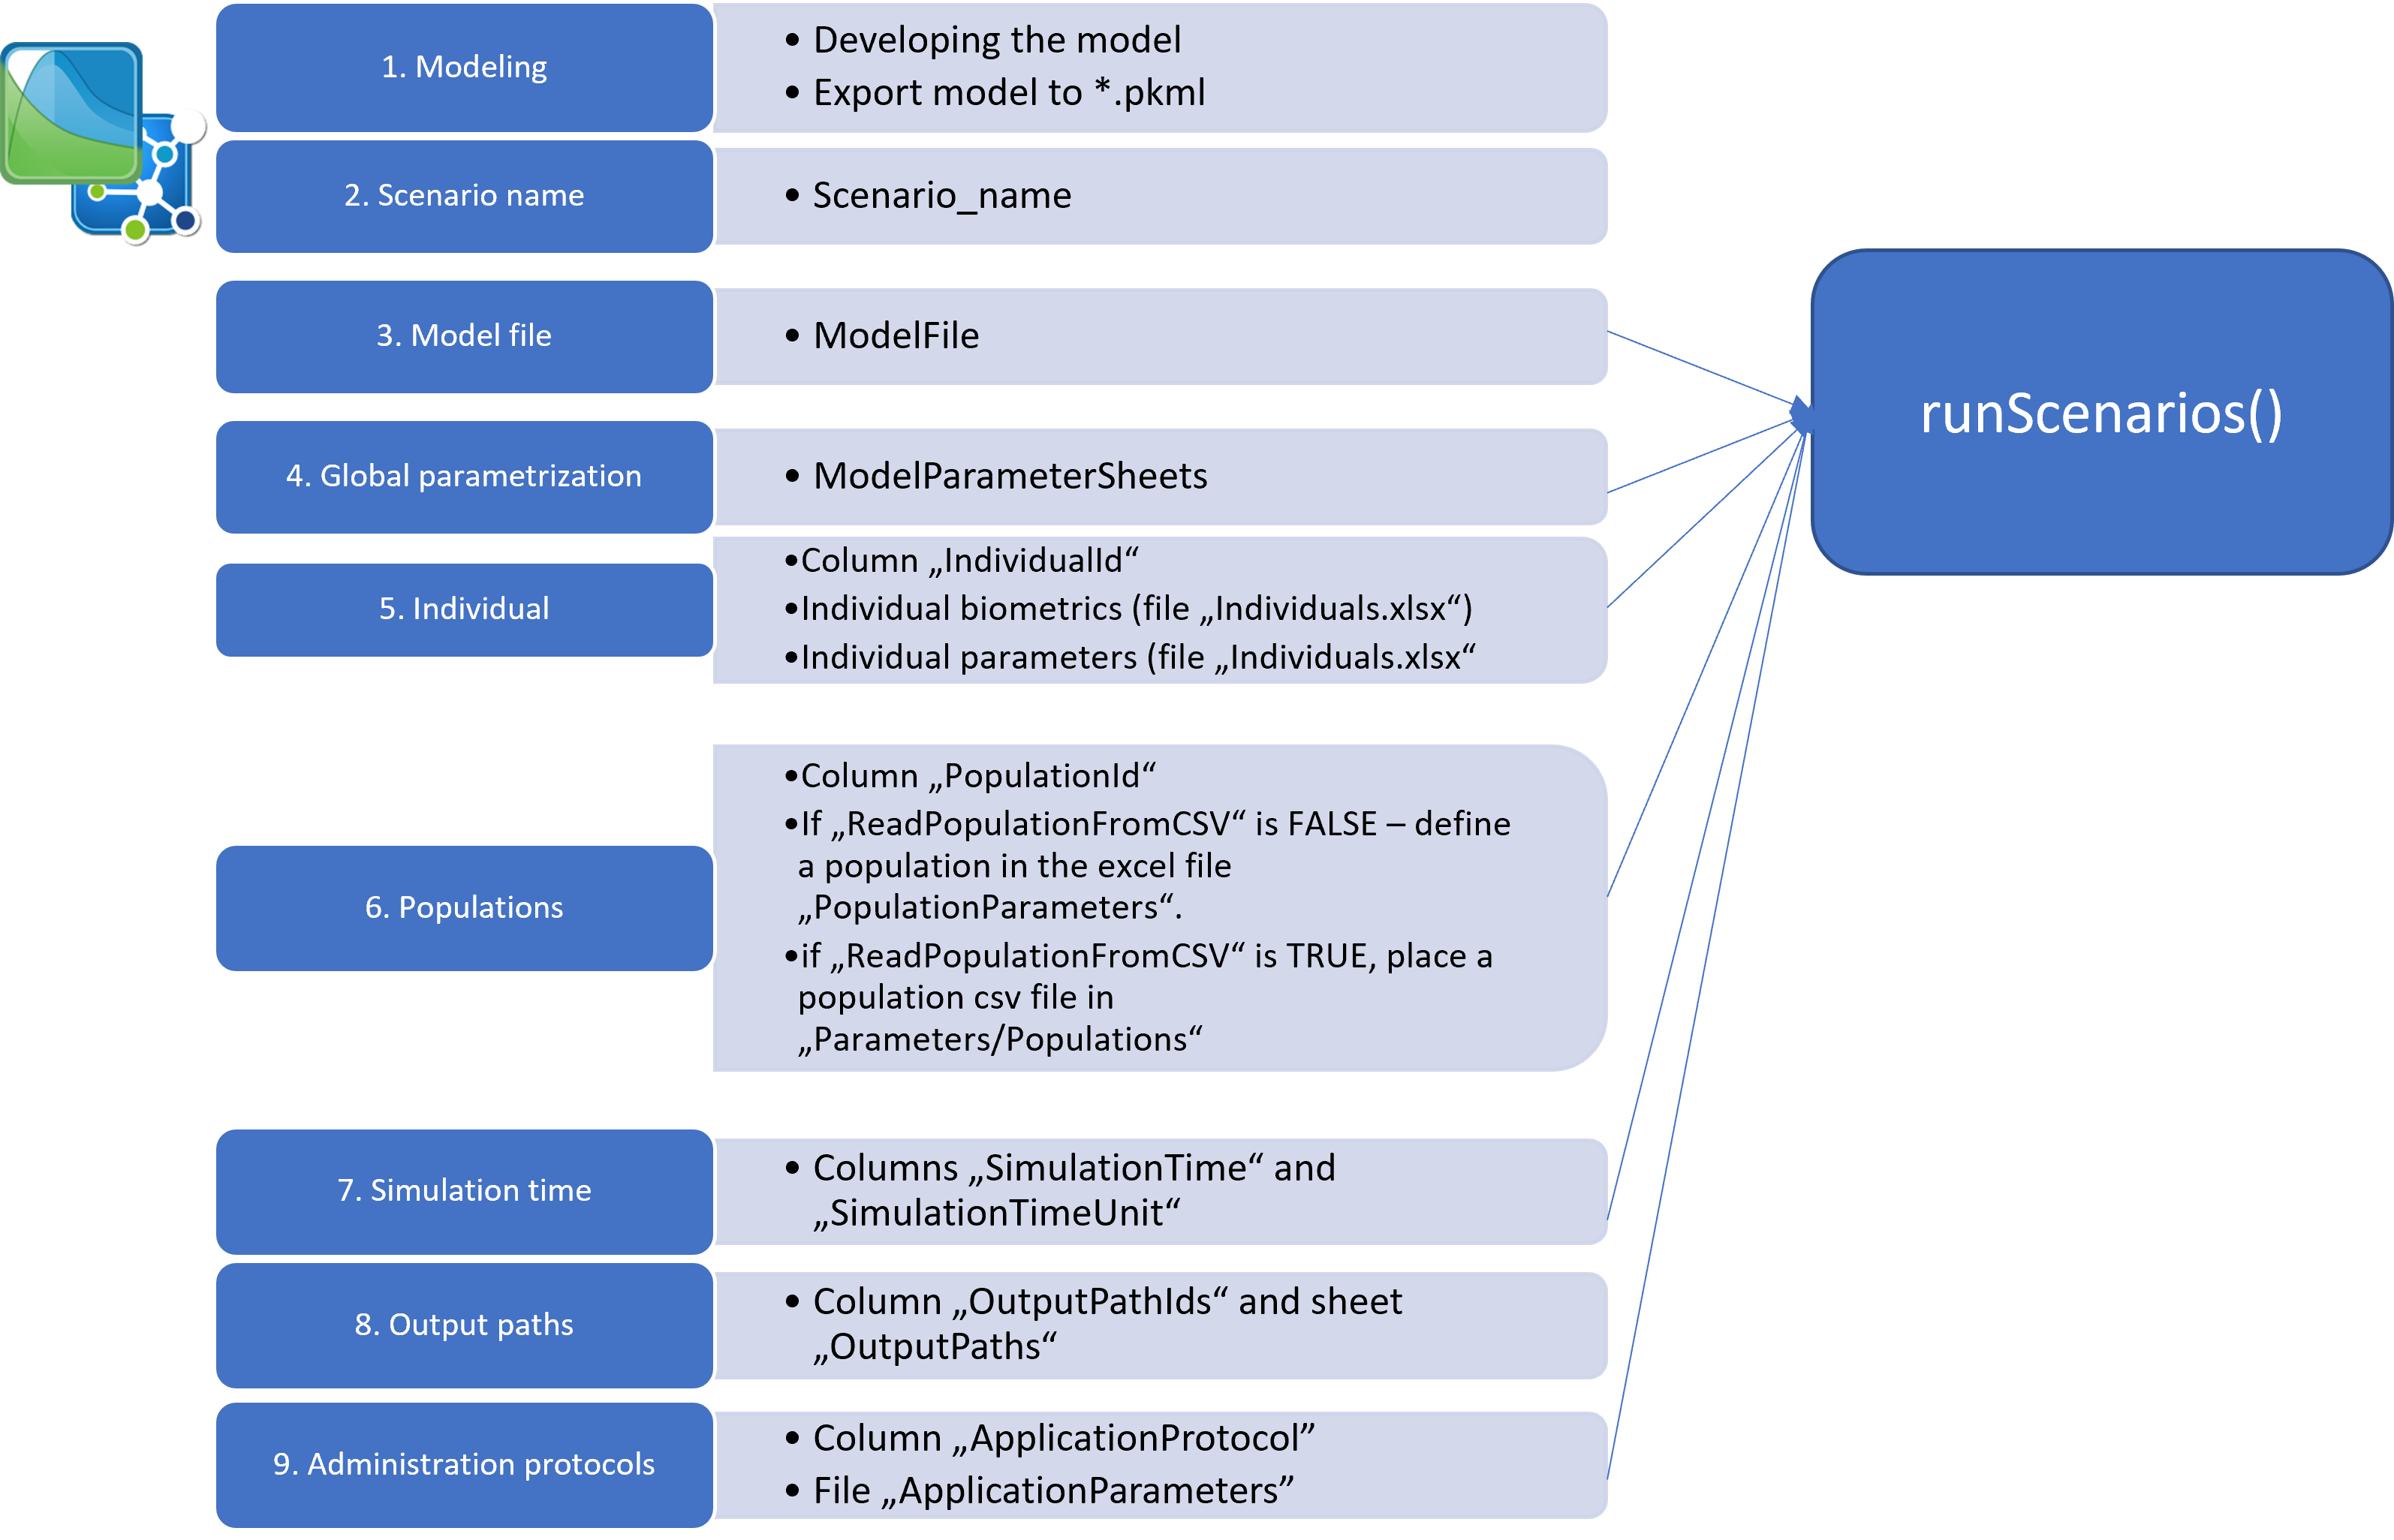
The step-wise approach of setting up a new simulation scenario is
shown in Figure 1; a detailed description of the Excel file structures
and R code are given in the Configuration files structure section.
Add a new scenario
1. Add the model file
After the model has been developed in PK-Sim and/or MoBi, a
simulation must be stored as a .pkml file in the
Models/Simulations folder.
2. Name the new scenario
To set up a simulation/scenario in R, open the file
Scenarios.xlsx located in the folder
Parameters. Start defining a scenario by giving it a
name in the Scenario_name column. The scenario
name will be used later to retrieve simulation results, e.g., in figure
definitions.
3. Link to the model file
Specify the simulation *.pkml file to use in the column
ModelFile.
If you want to run the simulation with the settings as it has been
exported from PK-Sim or MoBi, you can proceed to
vignette("run-simulations").
Customize a scenario
4. Simulation Parameters
You can define simulation parameters in the
ModelParameters.xlsx file. To apply them to the simulation,
you need to specify which sheets to load in the
ModelParameterSheets column of the
Scenarios.xlsx file.
5. Individuals
If you want to simulate a specific individual with individual
characteristics (age, weight, etc.) or apply individual model parameter
values to the simulation, define the individual in the
IndividualId column. Then create a new individual entry in
the Individuals.xlsx file.
- To create a new individual with specific biometrics, create a new
row in the
IndividualBiometricssheet. - To define an individual-specific parametrization, create a new sheet and name it as the individual’s ID.
If your model contains proteins (e.g., enzymes or transporters), you
have to specify their ontogenies in the column ‘Protein Ontogenies’ as a
list (separated by a ,) of
<Protein>:<Ontogeny> values. The value of
<Ontogeny> must be one of the standard ontogenies
implemented in the PK-Sim database (call
ospsuite::StandardOntogeny to see the list of supported
ontogenies). For example, if your model contains proteins with names
CYP3A4_alternative and CYP2D6_alternative, you
can specify their ontogenies by entering
CYP3A4_alternative:CYP3A4, CYP2D6_alternative:CYP2D6 in the
‘Protein Ontogenies’ column. If not specified, age-dependent protein
expression will not be considered.
6. Population
To run a population simulation, specify a population in the
column PopulationId. If you want to create a new population
each time you run the scenario, define population demographics in the
Demographics sheet of the
PopulationParameters.xlsx file. Remember that simulation
results might differ each time you run the scenario, as a new population
will be generated each time!
If you want to import a population from an existing CSV file, set the
value of the ReadPopulationFromCSV column to
TRUE. The population CSV file must be located in the
Parameters/Populations folder.
To apply ontogenies of proteins implemented in PK-Sim data base, you have to specify the ontogenies for the proteins in the model. See Section 5. Individuals for more information.
8. OutputPath
You can define the outputs of the simulation in the
OutputPathsIds column. For convenience, not the full paths
to the outputs must be listed, but their acronyms. The full path for
each acronym must be defined in the sheet OutputPaths.
9. Administration Protocols
Finally, you can simulate different administration protocols from the
same simulation file by defining an application protocol in the column
ApplicationProtocol. See the description below.
Now that you designed your own simulation, read
vignette("run-simulations") to continue the process. To
learn more about simulation design, read the following sections.
Alternative: Creating scenarios directly from PKML files
For more advanced users or when working programmatically,
esqlabsR provides functions to create scenario
configurations directly from PKML files, bypassing the need to manually
fill in Excel files:
-
createScenarioConfigurationsFromPKML(): Creates scenario configurations from PKML files by automatically extracting simulation settings, applications, and output paths. -
addScenarioConfigurationsToExcel(): Writes those configurations to the project’s Excel files (Scenarios.xlsxandApplications.xlsx) so they can be used in the standardesqlabsRworkflow.
This approach is particularly useful when:
- You have multiple PKML files to convert into scenarios at once.
- You want to automate or script scenario creation.
- Your simulation files already contain the settings you need (applications, output paths, simulation time).
What is automatically extracted from the PKML file
When you call createScenarioConfigurationsFromPKML()
without providing an argument for a particular setting, the function
reads it directly from the PKML file:
| Extracted from PKML | Corresponding argument | Fallback |
|---|---|---|
| Application protocol names | applicationProtocols |
Scenario name |
Output paths (outputSelections) |
outputPaths |
Simulation outputs defined in the PKML/simulation |
| Simulation time intervals | simulationTime |
(none) |
| Simulation time unit | simulationTimeUnit |
"min" |
You can override any of these by supplying the corresponding argument explicitly.
Basic workflow
The typical workflow for this approach consists of two steps:
Step 1 — Create scenario configurations from PKML:
projectConfiguration <- createProjectConfiguration("path/to/project/ProjectConfiguration.xlsx")

scenarios <- createScenarioConfigurationsFromPKML(
  pkmlFilePaths = "Models/Simulations/simulation.pkml",
  projectConfiguration = projectConfiguration
)
Step 2 — Write them to the project Excel files:
addScenarioConfigurationsToExcel(
  scenarioConfigurations = scenarios,
  projectConfiguration = projectConfiguration
)
That’s all. After calling
addScenarioConfigurationsToExcel(), the scenario appears in
Scenarios.xlsx and any application protocol parameters are
written to Applications.xlsx, ready to be used with
createScenarios().
Working with multiple PKML files
Pass a character vector of paths to create one scenario per file. Use
scenarioNames to give each scenario a meaningful name
(otherwise the simulation name stored inside the PKML is used):
scenarios <- createScenarioConfigurationsFromPKML(
  pkmlFilePaths = c(
    "Models/Simulations/adult.pkml",
    "Models/Simulations/pediatric.pkml"
  ),
  projectConfiguration = projectConfiguration,
  scenarioNames = c("Adult", "Pediatric")
)

addScenarioConfigurationsToExcel(
  scenarioConfigurations = scenarios,
  projectConfiguration = projectConfiguration
)
Vector recycling — same PKML, different settings
All arguments support vectorization. A length-1 value is recycled to every scenario, and longer vectors must match the total number of scenarios. This makes it easy to create many scenarios from a single base model:
# Three scenarios from the same PKML file, each with a different protocol
scenarios <- createScenarioConfigurationsFromPKML(
  pkmlFilePaths = "Models/Simulations/base_model.pkml",  # recycled to all 3
  projectConfiguration = projectConfiguration,
  scenarioNames = c("LowDose", "MediumDose", "HighDose"),
  applicationProtocols = c("Low_Protocol", "Med_Protocol", "High_Protocol")
)
Different settings per scenario
You can fully control every setting for each scenario individually:
scenarios <- createScenarioConfigurationsFromPKML(
  pkmlFilePaths = c(
    "Models/Simulations/pediatric.pkml",
    "Models/Simulations/adult.pkml",
    "Models/Simulations/elderly.pkml"
  ),
  projectConfiguration = projectConfiguration,
  scenarioNames = c("Pediatric", "Adult", "Elderly"),
  individualId = c("Child_001", "Adult_001", "Elderly_001"),
  applicationProtocols = c("Pediatric_Dose", "Standard_Dose", "Reduced_Dose"),
  steadyState = c(FALSE, TRUE, TRUE),
  steadyStateTime = c(NA, 2000, 1500)
)
Custom output paths
Supply a named vector, wrapped in a list, for
outputPaths to assign short aliases to the full model
paths. The names become the OutputPathId values in the
OutputPaths sheet of Scenarios.xlsx:
scenarios <- createScenarioConfigurationsFromPKML(
  pkmlFilePaths = "Models/Simulations/simulation.pkml",
  projectConfiguration = projectConfiguration,
  outputPaths = list(c(
    "plasma" = "Organism|PeripheralVenousBlood|Drug|Plasma (Peripheral Venous Blood)",
    "liver"  = "Organism|Liver|Intracellular|Drug|Concentration in container"
  ))
)
Appending vs. replacing scenarios
By default, addScenarioConfigurationsToExcel()
appends new scenarios to the existing content of
Scenarios.xlsx. Set appendToExisting = FALSE
to overwrite the file completely with only the new scenarios:
# Replace all existing scenarios with the new ones
addScenarioConfigurationsToExcel(
  scenarioConfigurations = scenarios,
  projectConfiguration = projectConfiguration,
  appendToExisting = FALSE
)
Details
Configuration files structure
The relevant Excel files for the definition of the scenarios are:
ApplicationParameters.xlsxIndividuals.xlsxModelParameters.xlsxPopulationParameters.xlsxScenarios.xlsx
The Scenarios sheet of the Scenarios.xlsx
file has the following structure:
Scenario_name
Unique name of the scenario. The name must be a valid R variables name.
IndividualId
Name (ID) of an individual. This name refers to the name of the
individual as used in Excel file Individuals.xlsx for the
definition of the biometric properties (sheet
IndividualBiometrics) of the simulated individual
individual-specific model parameters. For the latter, create a separate
sheet in the Individuals.xlsx files with the sheet name
being the IndividualId. The structure of these sheets is
the same as the structure of the sheets in the
ModelParameter.xlsx file, see description below.
IndividualId may be empty. In this case, the individual
as defined in the pkml simulation without any
individual-specific model parameters will be simulated. The same
individual can be used in multiple scenarios. It is possible to scale
from a human model to the species Beagle,
Dog, Minipig, Mouse,
Rat, Rabbit, and
Monkey by applying the respective individual to the
simulation. Other species scalings are technically possible but the
correctness of the results is not guaranteed as there exist some
structural differences between the species.
PopulationId
Name (ID) of a population. If empty, the scenario is simulated as an
individual simulation. Otherwise, population simulation is performed. If
the column ReadPopulationFromCSV is set to
FALSE, PopulationId refers to the name of
the population as defined in the sheet Demographics of the
file PopulationParameters.xlsx. To create a population with
specific demographic characteristics, define an entry with the same
population id in the Demographics. The same population can
be used in multiple scenarios. If the column
ReadPopulationFromCSV is set to TRUE, the
population will be imported from the CSV file located in the folder
Parameters/Populations, the name of the file must be the id
of the population. Note: You can define both an
IndividualId and a PopulationId. In
this case, individual-specific parameters from the
IndividualParameters.xlsx will be applied to the simulation
before applying the population parameters. Keep in mind, that any
physiological parameters defined for an individual that are also part of
the parameter set of a population will be overwritten by the population!
If, e.g., you specify the GFR of the individual in the
IndividualParameters.xlsx, it will be overwritten by the
GFR values sampled in the simulation.
ModelParameterSheets
A list of sheet names from the ModelParameter.xlsx file,
separated by a ,. Each sheet must contain
Container Path, Parameter Name,
Value, and Units. Parameter values from
specified sheets will be applied to the model according to the order of
their definition. E.g., if we define Global, Aciclovir,
then parameters from the Aciclovir sheet will be applied
after the Global parameters.
ModelParameterSheets may be empty or specify as many
sheets as required. Note that the specified sheets must be present in
the ModelParameter.xlsx file. This approach aims to have
global parameters that can be applied to most scenarios and a
separate set of parameters for, e.g., different disease states
(parameter sheets Healthy and CKD) or separate
parametrization of different compounds (sheet
Aciclovir).
You can further refine the parametrization of the scenario by specifying
the individual parameters in the IndividualParameters.xlsx
file. Create a sheet with the name as the IndividualId
specified for the respective scenario with the same structure as the
ModelParameters.xlsx file. This way, you can define, e.g.,
individual-specific clearance values or, as in the example case, the
glomerular filtration rate. Individual-specific parameters are applied
after the parameters defined in the ModelParameterSheets. You
can use an individual in multiple scenarios. This step is ignored if an
individual is specified in the scenario definition, but no sheet with
this name exists in the IndividualParameters.xlsx file.
ApplicationProtocol
Name of the application protocol that will be applied. Applications
are defined as parameters that will be applied to the model in the file
ApplicationParameters.xlsx. For each application, create a
sheet with the name as specified in the
ApplicationProtocol entry and populate it with the same
structure as the ModelParameter.xlsx file. Configuring
application protocols this way requires that the loaded simulation
includes all possible applications that can be turned on and off by
setting parameters, e.g., the Dose or
Start time parameters. As it might be cumbersome to create
entries for all administration parameters manually, we can use the
getAllApplicationParameters() function to get a list of all (constant)
parameters in the Applications container. In the following
example, we will extract application parameters for the molecule
Aciclovir from the example simulation:
sim <- loadSimulation(system.file(
  "extdata",
  "Aciclovir.pkml",
  package = "ospsuite"
))
applicationParams <- getAllApplicationParameters(sim)
print(applicationParams)
#> [[1]]
#> <Parameter>
#>   • Quantity Type: Parameter
#>   • Path: Events|IV 250mg 10min|Application_1|ProtocolSchemaItem|Start time
#>   • Value: 0.00e+00 [min]
#>
#> ── Formula ──
#>
#>   • isConstant: TRUE
#>
#> [[2]]
#> <Parameter>
#>   • Quantity Type: Parameter
#>   • Path: Events|IV 250mg 10min|Application_1|ProtocolSchemaItem|Dose
#>   • Value: 2.50e-04 [kg]
#>
#> ── Formula ──
#>
#>   • isConstant: TRUE
#>
#> [[3]]
#> <Parameter>
#>   • Quantity Type: Parameter
#>   • Path: Events|IV 250mg
#>   10min|Application_1|ProtocolSchemaItem|DosePerBodySurfaceArea
#>   • Value: 0.00e+00 [kg/dm²]
#>
#> ── Formula ──
#>
#>   • isConstant: TRUE
#>
#> [[4]]
#> <Parameter>
#>   • Quantity Type: Parameter
#>   • Path: Events|IV 250mg
#>   10min|Application_1|ProtocolSchemaItem|DosePerBodyWeight
#>   • Value: 0.00e+00 [kg/kg]
#>
#> ── Formula ──
#>
#>   • isConstant: TRUE
#>
#> [[5]]
#> <Parameter>
#>   • Quantity Type: Parameter
#>   • Path: Events|IV 250mg 10min|Application_1|ProtocolSchemaItem|Infusion time
#>   • Value: 10.00 [min]
#>
#> ── Formula ──
#>
#>   • isConstant: TRUE
And export the parameters to an Excel file using the
exportParametersToXLS() function:
exportParametersToXLS(
  parameters = applicationParams,
  paramsXLSpath = "../Applications.xlsx"
)
If you need to add more parameters to an existing Excel file without
overwriting it, you can use the append parameter:
# Add more parameters to existing file
exportParametersToXLS(
  parameters = additionalParams,
  paramsXLSpath = "../Applications.xlsx",
  sheet = "AdditionalProtocol",
  append = TRUE
)
The created Excel file will have the same structure as all
Parameter-files and can be directly loaded in MoBi or R using the
readParametersFromXLS() function.
SimulationTime
Time of the simulation. Multiple simulation time intervals can be
defined, each being a triplet of <StartTime, EndTime, Resolution>
values. Resolution is the number of simulated points per time unit
defined in the column TimeUnit. Simulation intervals are
separated by a ;.
For example, to simulate the model for 10 minutes with a resolution
of 1 point per minute, the value of the column
SimulationTime should be 0, 10, 1, and that of
the column SimulationTimeUnit should be min.
To simulate the model for
- 20 hours with a resolution of 1 point per minute, then
- for three weeks (equals to 3724 = 504 hours) with a resolution of 1 point per hour, and finally
- for two days (equals to 504 + 2*24 = 552 hours) with a resolution of 10 points per hour,
the value of the column SimulationTime should be
0, 20, 60; 20, 504, 1; 504, 552, 10, and that of the column
SimulationTimeUnit should be h.
SimulationTimeUnit
Unit for SimulationTime. For supported units, see
ospsuite::ospUnits.
SteadyState
If TRUE, the model will be simulated for a “sufficiently
long” time (1000 minutes by default).
SteadyStateTimeUnit
Unit for SteadyStateTime. For supported units, see
ospsuite::ospUnits.
ModelFile
Name of the pkml file with the simulation. It must be
located in the folder defined in
ProjectConfiguration$modelFolder.
OutputPathsIds
Paths of model outputs (i.e., paths to the molecules/ parameters for
which outputs will be simulated) can be defined in the sheet
OutputPaths. Create an entry for each output path by
entering the full path into the column OutputPath and
defining a unique identifier for this path in the column
OutputPathId. The content of the sheet could look like
this:
| OutputPathId | OutputPath |
|---|---|
| Aciclovir_PVB | Organism|PeripheralVenousBlood|Aciclovir|Plasma (Peripheral Venous Blood) |
| Aciclovir_fat_cell | Organism|Fat|Intracellular|Aciclovir|Concentration in container |
In the Scenarios sheet, enter the IDs of all paths the
outputs should be generated for, separated by a comma, e.g.,
Aciclovir_PVB, Aciclovir_fat_cell.
When creating scenarios programmatically with
createScenarioConfigurationsFromPKML(), you can provide
outputPaths as a list of named vectors (one element per
scenario), where the element names become the OutputPathId
values automatically — see Custom output
paths above. Avoid passing a bare named vector, which would be
recycled across scenarios.
Scenario parameterization hierarchy
The final parameterization combines the different parameterization steps defined at various levels, as described in the section above. The following figure summarizes the hierarchy of the parameterization.
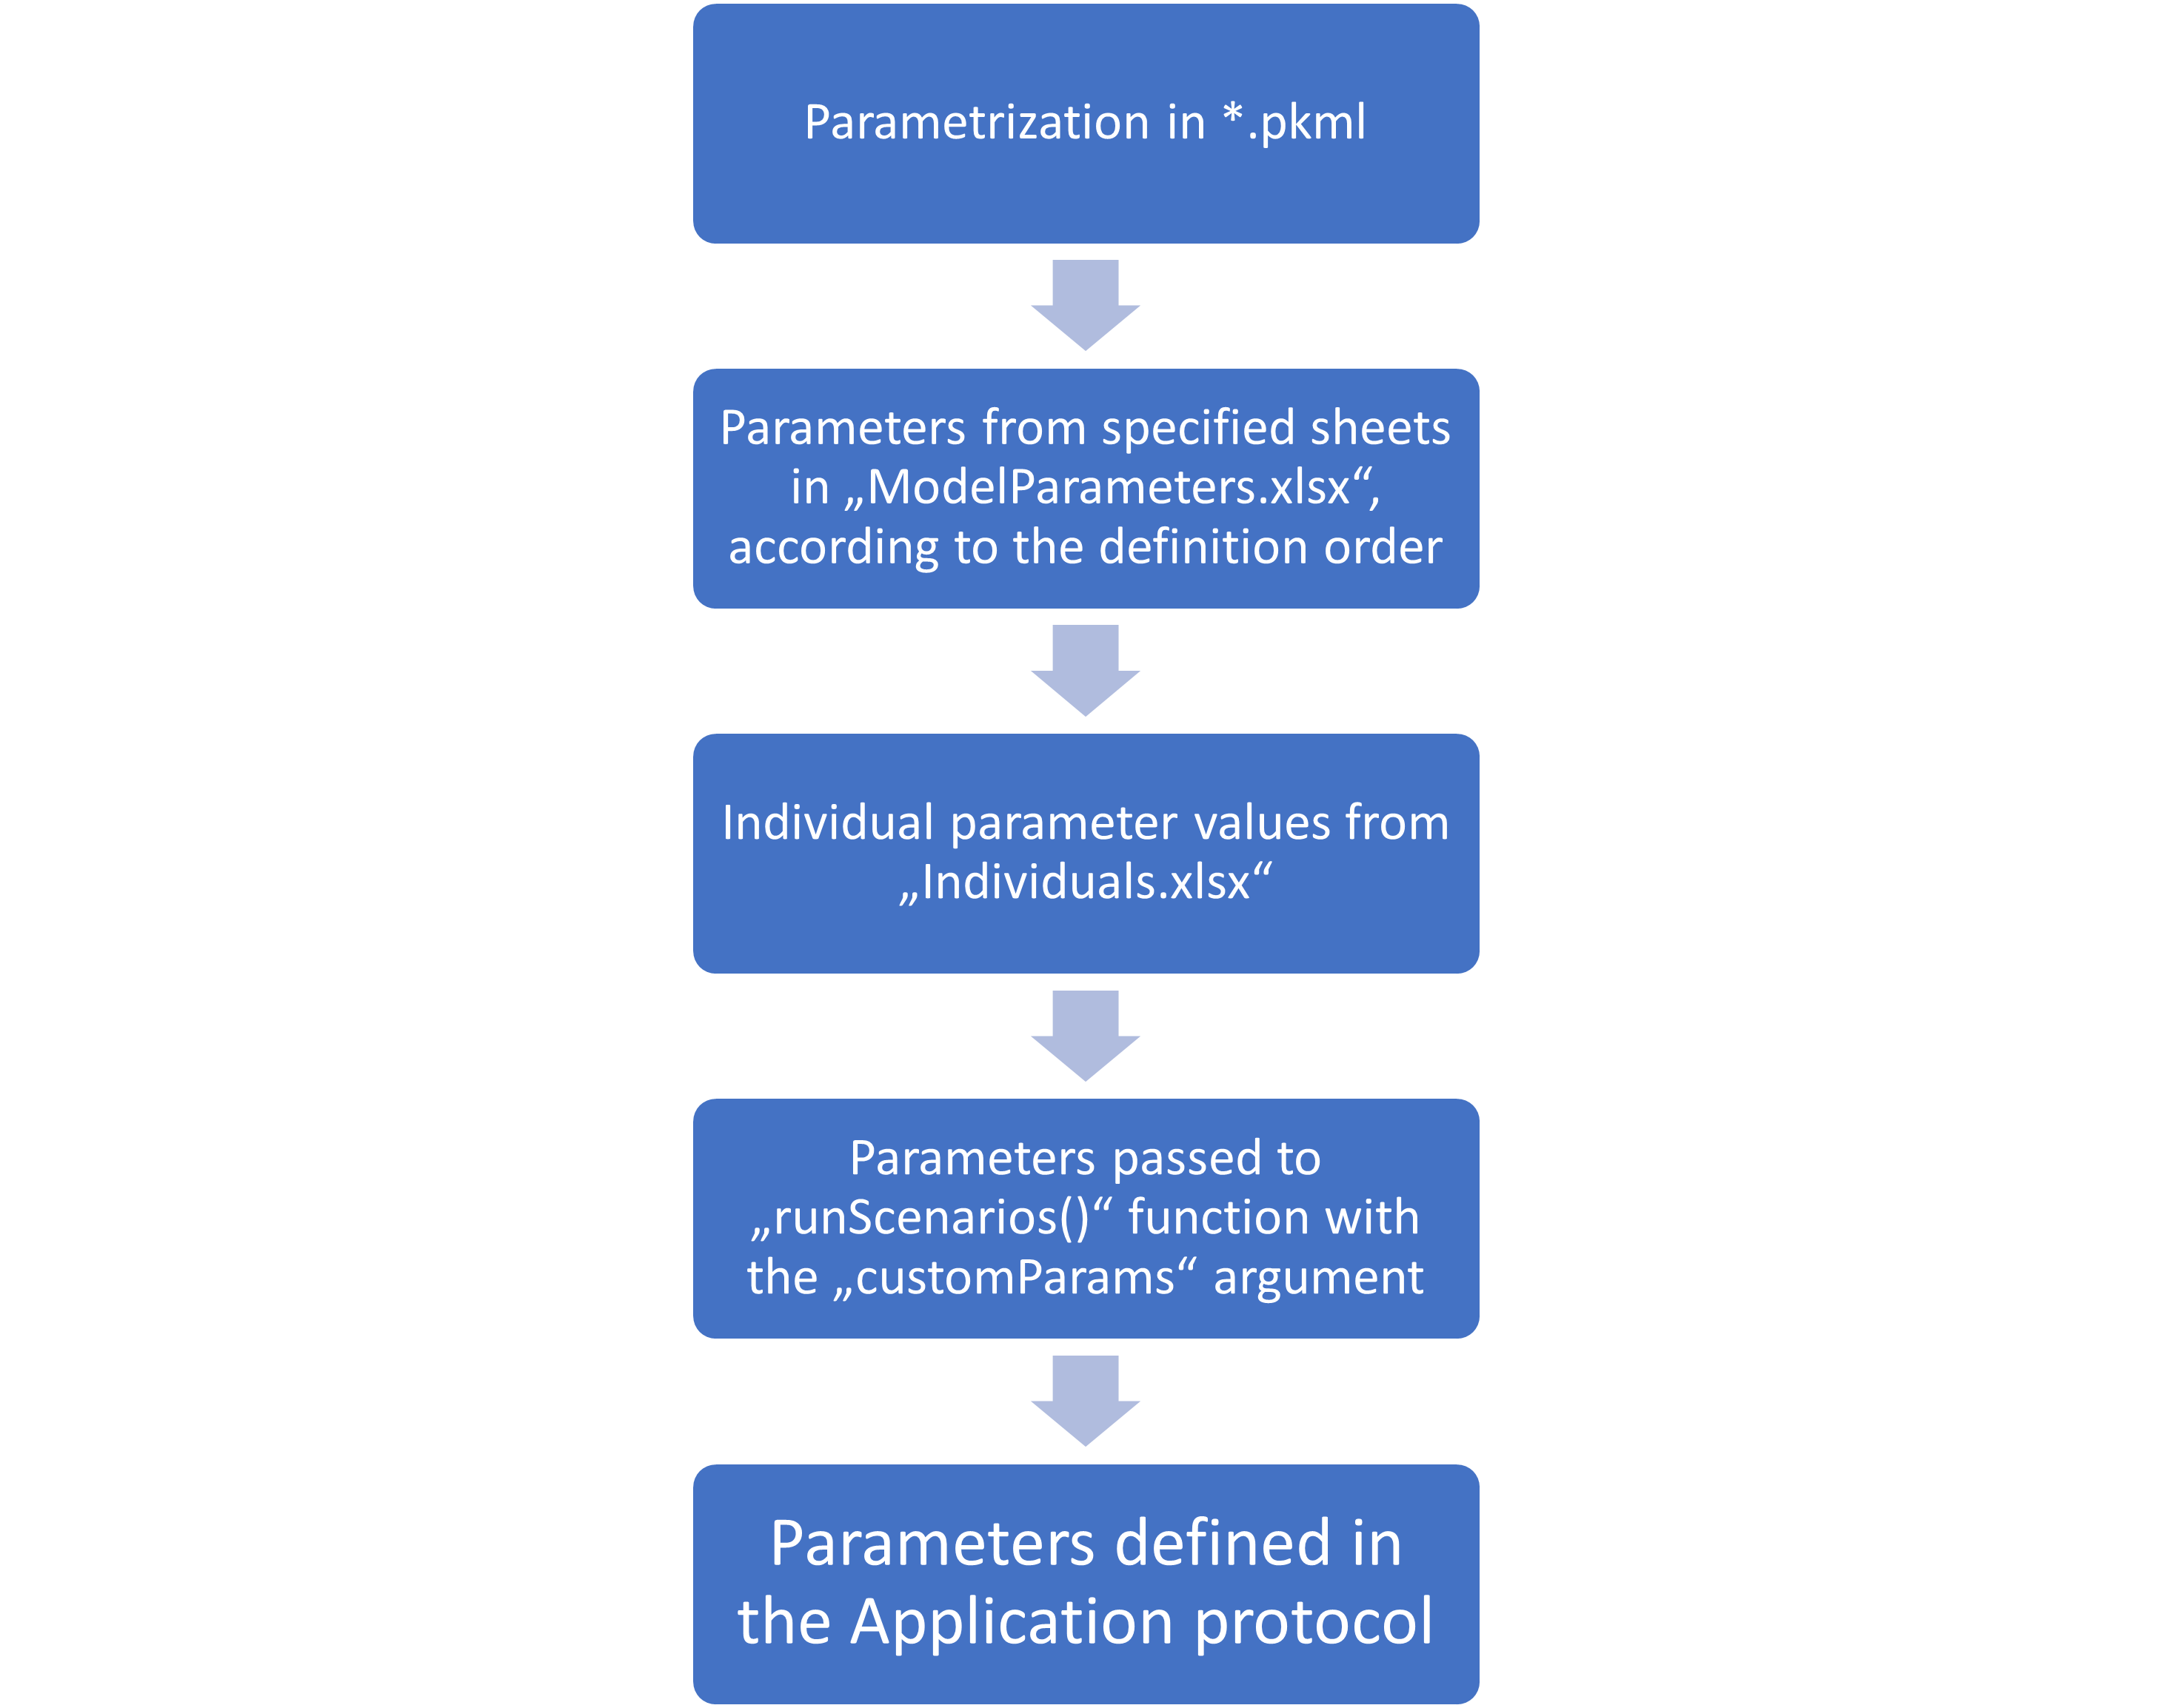
If a parameter path is defined in multiple steps, its value will be
overwritten by the subsequent steps. That means individual parameter
values will overwrite the values defined in the “ModelParameters.xlsx”
file, and parameters specified in the customParams argument
of the createScenarios() function will overwrite everything
else.
The order of parameter sheets of the “ModelParameters.xlsx” file defined in the ModelParameterSheets column defines the order in which the parameters are applied.